Build a Lab
To run nmeta, you’re going to need an OpenFlow network to provide the data plane connectivity.
There are many different options for building a lab network. The choice is likely to come down to what resources you have and the use cases you want to test.
Virtual labs are easy to set up and don’t require specialised hardware, but aren’t useful for testing devices in the real world.
Physical labs are harder to construct and require hardware, but can be used to connect real-world devices.
OpenFlow SDN disaggregates the data and control planes; this means the lab environments can be used with different OpenFlow controllers and apps, should you wish.
Physical Labs
OpenWRT with Open vSwitch
This lab is based on a TP-Link TL-WR1043ND Hardware Version 2.1 home router that is re-flashed to run OpenWRT with Open vSwitch running OpenFlow (yes, that’s three different pieces of software that start with the word ‘Open’...)
Be warned that reflashing a router is likely to void it’s warrantee, and may result in the router becoming ‘bricked’, whereby it is unrecoverable. Continue at your own risk...
You’ll also need a physical Linux PC with two NICs that has been built with nmeta as per the install instructions.
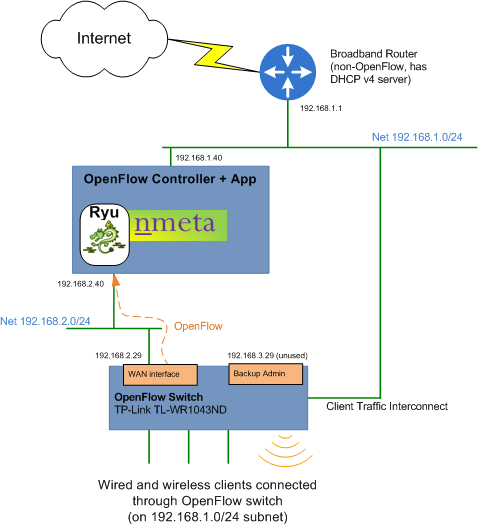
The configuration of the lab is shown below:
These instructions haven’t been tested end-to-end. Please raise an issue if there are changes required.
Convert Router to OpenWRT
Start by converting the TP-Link TL-WR1043ND to running OpenWRT as per the instructions from the OpenWRT website at:
https://wiki.openwrt.org/toh/tp-link/tl-wr1043nd
When router is successfully running OpenWRT, proceed to the next step:
Configure the Router
Apply a basic configuration to the router to allow remote access.
Connect a device with SSH capability to a LAN port on the TP-Link, set a static IP address of 192.168.1.2 mask 255.255.255.0 (or use DHCP) and SSH to 192.168.1.1.
Set root password to something secure, and not used elsewhere.
Compile OpenWRT with Open vSwitch Image
Note: If you don’t want to compile your own image then consider using an image from https://github.com/mattjhayes/TP-Link-TL-1043ND-OpenvSwitch and jump ahead to http://nmeta.readthedocs.io/en/develop/userguide/build_a_lab.html#upgrade
Compilation Host
To compile the router firmware, use an Ubuntu 16.04.2 server or desktop (can be virtual) with at least 30GB of disk space.
Clone OpenWRT
On the compilation host, clone OpenWRT (note: GitHub, not direct from OpenWRT site):
git clone https://github.com/openwrt/openwrt.git
Install Dependancies
sudo apt-get update
sudo apt-get install git-core build-essential libssl-dev libncurses5-dev unzip gawk zlib1g-dev
sudo apt-get install subversion mercurial
sudo apt-get install gcc-multilib flex gettext
Update Feeds
cd openwrt
./scripts/feeds update -a
./scripts/feeds install -a
Make MenuConfig
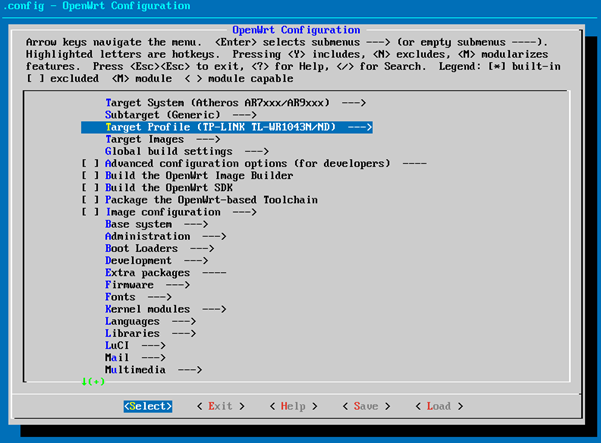
make menuconfig
Change Target Profile to suit hardware (select TP-LINK TL-WR1043N/ND for TP-Link TL-WR1043ND Hardware Version 2.1):
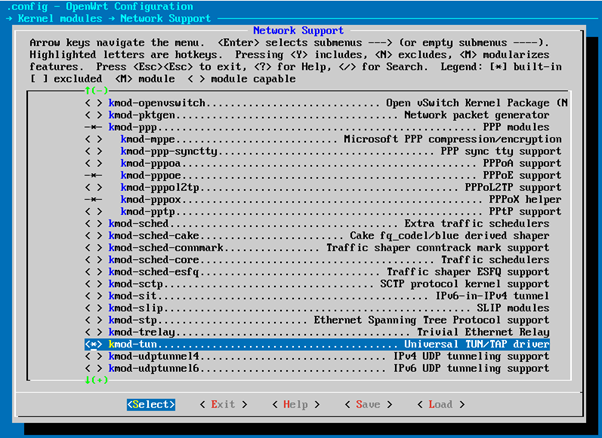
Then select Kernel Modules -> Network Support -> kmod-tun:
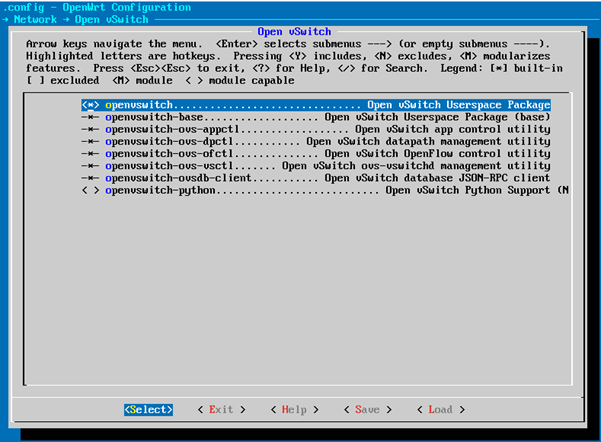
Exit out back to main screen, then select Network -> Open vSwitch and select:
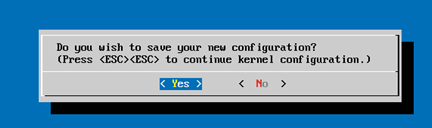
Save on exit:
This one takes a while:
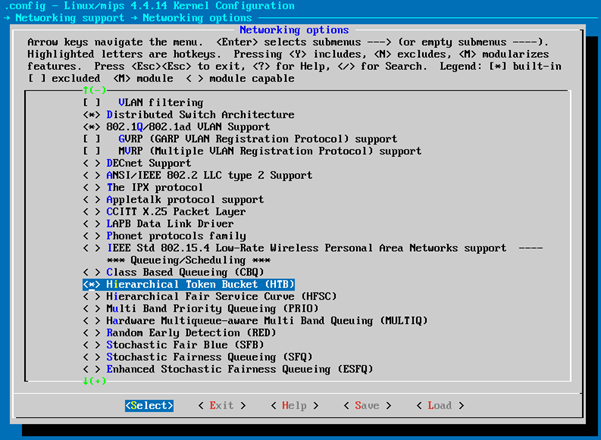
make kernel_menuconfig
When finished brings up another menu. Navigate to Networking support -> Networking options and select Hierarchical Token Bucket (HTB):
Patch for Wi-Fi Authentication
Standard OpenWRT build with Open vSwitch cannot run authentication on Wi-Fi, see: https://forum.openwrt.org/viewtopic.php?id=59129
We apply a patch to fix this:
cd ~/openwrt/package/network/services/hostapd/
vi 710-hostapd-Initial-OVS-support.patch
Paste in contents of patch (starting from the —) from https://github.com/helmut-jacob/hostapd/commit/c89daaeca4ee90c8bc158e37acb1b679c823d7ab.patch Save and exit.
Patch with Quilt. Install quilt:
sudo apt install quilt
In home dir, need to run this once:
cat > ~/.quiltrc <<EOF
QUILT_DIFF_ARGS="--no-timestamps --no-index -p ab --color=auto"
QUILT_REFRESH_ARGS="--no-timestamps --no-index -p ab"
QUILT_SERIES_ARGS="--color=auto"
QUILT_PATCH_OPTS="--unified"
QUILT_DIFF_OPTS="-p"
EDITOR="nano"
EOF
Run this from ~/openwrt/
make package/network/services/hostapd/{clean,prepare} V=s QUILT=1
cd to created directory:
cd ~/openwrt/build_dir/target-mips_34kc_musl-1.1.16/hostapd-wpad-mini/hostapd-2016-06-15/
Apply existing patches:
quilt push -a
Now at patch 710-hostapd-Initial-OVS-support.patch. Run this:
quilt edit src/main.c
Run this:
quilt refresh
Change dir to the build root and run
cd ../../../../
make package/network/services/hostapd/update V=s
Then run:
make package/network/services/hostapd/{clean,compile} package/index V=s
Then run:
make
Copy Image
Navigate to the directory where the output files are:
cd bin/ar71xx
There should be multiple files in the directory, including this file:
openwrt-ar71xx-generic-tl-wr1043nd-v2-squashfs-sysupgrade.bin
Use SCP to copy the appropriate file to the router:
scp ./openwrt-ar71xx-generic-tl-wr1043nd-v2-squashfs-sysupgrade.bin USERNAME@192.168.1.1:tmp/
Upgrade
Note: consider backing up config etc first...
Once image file is confirmed as being in the /tmp directory on the TPLink, and you’re happy you’ve backed up your configurations, run the sysupgrade:
sysupgrade -v /tmp/openwrt-ar71xx-generic-tl-wr1043nd-v2-squashfs-sysupgrade.bin
Configure OpenWRT
OpenWRT needs to be configured to work with Open vSwitch. The configuration has been tested, but needs to be changed to meet your requirements.
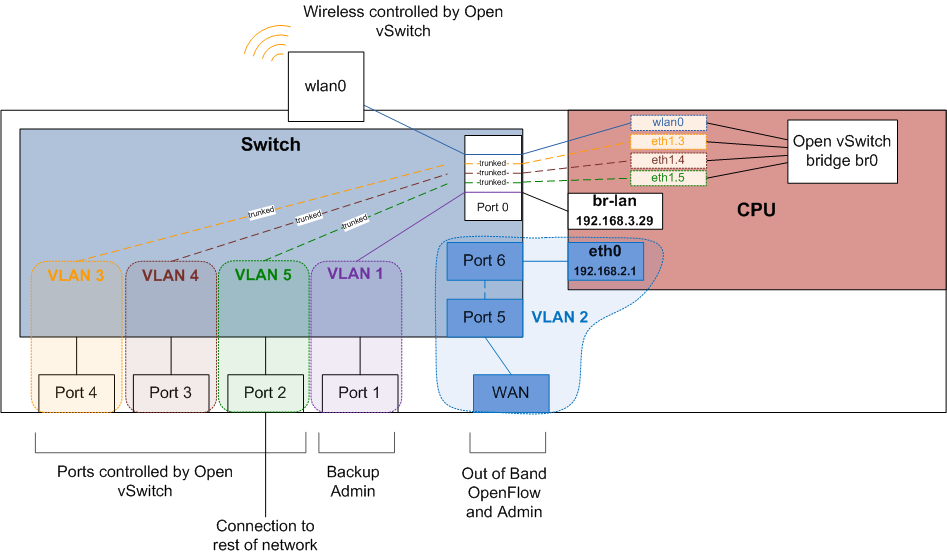
The following diagram shows how OpenWRT with Open vSwitch is configured on the TP-Link hardware:
Dropbear
Configure Dropbear (SSH server) to listen on the WAN interface, in addition to the LAN interface. This gives an additional way to access the device to administer it, lowering the risk of bricking it.
Note: not a great idea doing this if Internet-facing for security reasons, so remember to remove WAN config if you ever convert device back to an Internet router.
Backup dropbear config:
cp /etc/config/dropbear /etc/config/dropbear.original
Add these lines to /etc/config/dropbear for WAN, full file is:
config dropbear
        option PasswordAuth 'on'
        option Port '22'
        option Interface 'lan'

config dropbear
        option PasswordAuth 'on'
        option Port '22'
        option Interface 'wan'
Firewall
Firewall (/etc/config/firewall) should be default permissive policy:
config defaults
        option syn_flood        1
        option input            ACCEPT
        option output           ACCEPT
        option forward          ACCEPT
Network
Backup network config:
cp /etc/config/network /etc/config/network.original
This is the new complete /etc/config/network file:
config interface 'loopback'
        option ifname 'lo'
        option proto 'static'
        option ipaddr '127.0.0.1'
        option netmask '255.0.0.0'

config interface 'lan'
        option ifname 'eth1'
        option force_link '1'
        option type 'bridge'
        option proto 'static'
        option ipaddr '192.168.3.29'
        option netmask '255.255.255.0'

config interface 'wan'
        option ifname 'eth0'
        option proto 'static'
        option ipaddr '192.168.2.29'
        option netmask '255.255.255.0'
        option defaultroute '1'
        option gateway '192.168.2.40'
        option dns '8.8.8.8'

config switch
        option name 'switch0'
        option reset '1'
        option enable_vlan '1'

config switch_vlan
        option device 'switch0'
        option vlan '1'
        option ports '0 4'

config switch_vlan
        option device 'switch0'
        option vlan '2'
        option ports '5 6'

config switch_vlan
        option device 'switch0'
        option vlan '3'
        option ports '0t 1'

config switch_vlan
        option device 'switch0'
        option vlan '4'
        option ports '0t 2'

config switch_vlan
        option device 'switch0'
        option vlan '5'
        option ports '0t 3'

config interface
        option ifname 'eth1.3'
        option proto 'static'
        option ipv6 '0'

config interface
        option ifname 'eth1.4'
        option proto 'static'
        option ipv6 '0'

config interface
        option ifname 'eth1.5'
        option proto 'static'
        option ipv6 '0'

config interface 'wan6'
        option proto 'dhcpv6'
        option ifname '@wan'
        option reqprefix 'no'

config interface
        option ifname 'br0'
        option proto 'static'

config interface
        option ifname 'wlan0'
        option proto 'static'
Wireless
Backup wireless config:
cp /etc/config/wireless /etc/config/wireless.original
Take note of the items in CAPITALS that need you to fill in appropriate values. This is the new complete /etc/config/wireless file:
config wifi-device 'radio0'
        option type 'mac80211'
        option channel '11'
        option hwmode '11g'
        option path 'platform/qca955x_wmac'
        option htmode 'HT20'
        option log_level '1'

config wifi-iface
        option device 'radio0'
        option network 'wlan0'
        option mode 'ap'
        option ssid 'YOUR_SSID_HERE'
        option encryption 'psk2'
        option key 'YOUR_KEY_HERE'
Configure Open vSwitch
Now it’s time to configure Open vSwitch by setting up bridge br0, adding ports to it, then setting it to talk OpenFlow to the Controller:
ovs-vsctl add-br br0
ovs-vsctl add-port br0 eth1.3
ovs-vsctl add-port br0 eth1.4
ovs-vsctl add-port br0 eth1.5
ovs-vsctl add-port br0 wlan0
ovs-vsctl set-controller br0 tcp:192.168.2.40:6633
Configure Aliases
Aliases are useful for frequently run commands. Here are some suggested aliases.
Edit file /etc/profile and add these lines:
# OpenWRT Network Commands:
alias nwr='/etc/init.d/network restart'

# Open vSwitch Commands:
alias ovshow='ovs-vsctl show'
alias ovmacs='ovs-appctl fdb/show br0'
alias ovrestart='/etc/init.d/openvswitch restart'

# Open vSwitch OpenFlow Commands:
alias ofshow='ovs-ofctl show br0'
alias offlows='ovs-ofctl dump-flows br0'
alias ofports='ovs-ofctl dump-ports br0'
Log out and back in again to enable new aliases.
Cabling
Wire the environment together as per earlier diagram, and ensure the Linux PC has it’s network interfaces configured correctly.
Checks
Using our aliases, here are checks to run:
# ovshow
<snip>
  Bridge "br0"
      Controller "tcp:192.168.2.40:6633"
          is_connected: true
      Port "br0"
          Interface "br0"
              type: internal
      Port "wlan0"
          Interface "wlan0"
      Port "eth1.3"
          Interface "eth1.3"
      Port "eth1.4"
          Interface "eth1.4"
      Port "eth1.5"
          Interface "eth1.5"
Note the is_connected: true. This means OpenFlow has been established to the controller.
Links
Instructions were based on these tutorials:
Building and Configuring Open vSwitch on OpenWrt for Cloud Networking byPravin R. Turning TP-LINK WR1043NDv2.1 router into OpenFlow-enabled switch by Lucas Burson
Virtual Labs
Mininet with Vagrant
UNDER CONSTRUCTION
In this lab we use Vagrant to automate the start up and build of multiple VirtualBox Ubuntu guests.
These instructions assume you’re running Windows, but should be easily adapted to other operating systems as most of the work happens within the virtual environment.
Install VirtualBox
Download and install VirtualBox from https://www.virtualbox.org/wiki/Downloads
Install Vagrant
Download and install Vagrant from https://www.vagrantup.com/
Download a box
We will use the bento box of Ubuntu 16.04 in this lab. Download this box on your host machine with:
vagrant box add bento/ubuntu-16.04
Choose virtualbox option from menu
Clone Vagrant Repo
Clone the Vagrant repo from https://github.com/mattjhayes/Vagrant onto your host machine.
Start the Guest
In a command prompt, from base of cloned repo, navigate to the SDN_LabsMininet_Ryu_nmeta directory:
cd SDN_Labs\Mininet_Ryu_nmeta
Start the guest by running this on the host machine command prompt:
vagrant up
When the guest is up, connect to it with SSH on localhost:2222
username/password are both vagrant
run nmeta (from alias):
nm
Start a second SSH session and run the nmeta api:
nma
In a third SSH session run Mininet:
mnt
TBD - UNDER CONSTRUCTION
VirtualBox with Vagrant
UNDER CONSTRUCTION
In this lab we use Vagrant to automate the start up and build of multiple VirtualBox Ubuntu guests.
These instructions assume you’re running Windows, but should be easily adapted to other operating systems as most of the work happens within the virtual environment.
Install VirtualBox
Download and install VirtualBox from https://www.virtualbox.org/wiki/Downloads
Install Vagrant
Download and install Vagrant from https://www.vagrantup.com/
Download a box
We will use the bento box of Ubuntu 16.04 in this lab. Download this box on your host machine with:
vagrant box add bento/ubuntu-16.04
Choose virtualbox option from menu
Clone Vagrant Repo
Clone the Vagrant repo from https://github.com/mattjhayes/Vagrant onto your host machine.
Start the Guest
In a command prompt, from base of cloned repo, navigate to the SDN_LabsRyu_nmeta_SystemTestLab directory:
cd SDN_Labs\Ryu_nmeta_SystemTestLab
Start the guest by running this on the host machine command prompt:
vagrant up
When the guests are up, connect to the controller with SSH on localhost:2203 (first guests is port 2222 then ports 2200 and upwards for other guests)
username/password are both vagrant
run nmeta (from alias):
nm
Start a second SSH session and run the nmeta api:
nma
TBD - UNDER CONSTRUCTION